Getting Started with Live Chat
This module is used to connect end-users to live agents/support staff from the BOT. In this way the BOT conversations can be configured to connect end-users to a live chat team when required. This configuration is purely customizable depending on your needs. For more info on the customization, you can contact your SPOC at Actionable Science.
Roles Involved
Chat Agent – This role is required so that support staff can access My Chats and can work on incoming chats.
Chat Agent Admin – This is required so that a support agent can access Live Chat Settings and perform activities like create / update queues, add/ remove an agent from a queue.
Chat Agent Supervisor - This is required to monitor agent chats.
Menu items of Live Chat
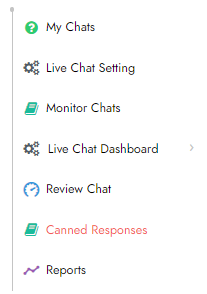
My Chats: Shows the incoming chats and chats being serviced.
Monitor Chats: This option will only show for Supervisors. They can monitor chats live and assign agents if needed.
Live Chat Settings: Include all settings related to chat queues and support agents in the chat.
Review Chat: This is used to review all chats that are handled by the chat support team
Canned Responses: This is used by agents to create and manage their personal Canned Responses.
Reports: This section has reports specific to Live Chat.
My Chats
This is the main screen where all chats from end-users show. Below is how the chat terminal looks like

Screen Components
Incoming Chats:
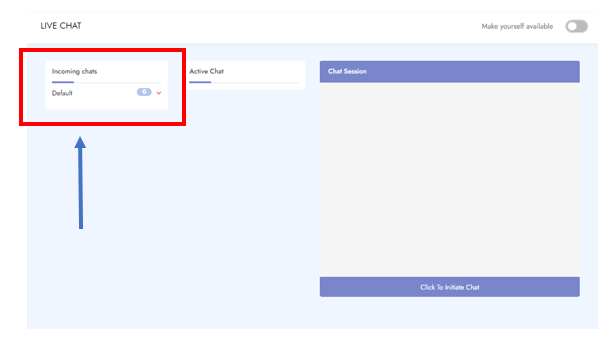
- These are the unanswered chats waiting in the queue.
- You will see the queue name such as “Facilities” and the number of chats waiting in the blue square
Active Chat:
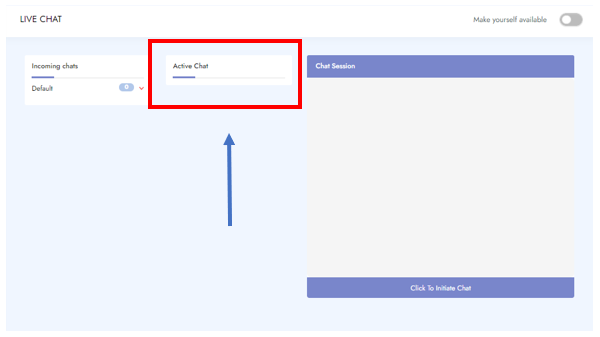
· This shows the list of end-users that are currently being serviced. In other words, these are chats that are in work in progress.
· Under active chats, an agent can see details (name/email id) of the user who they are servicing.
· In case there are multiple queues that a support user is servicing, then they will see the queue name followed by users being serviced in each queue.
Chat Session:
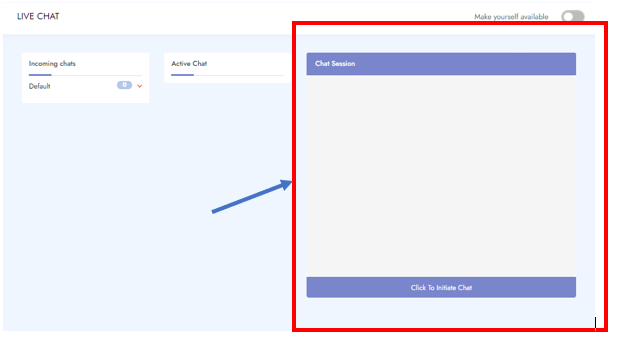
· This window shows the current chat at which a support user is working on at any point in time. This will show the chat transcript between user and agent/ BOT.
How does Live Chat works
Within the BOT configuration that ASC does for you based on your requirements, we enable different live chat escalation points from which end users can simply click in the BOT and get connected to a live chat agent.
Based on requirements, Virtual Agent is enabled too either:
1. Escalate the chat directly to live chat team without checking if a human agent is available
2. Check availability of the team and prompt the user to talk to a live agent only if at least one agent is available from the queue.
Based on the configuration, when a chat comes in Incoming Chat panel, an agent will get a pop up on the top right and a pop-up sound that notify them of an incoming chat.
Enable Availability to take Chats
1. Go to Live Chat ->My Chats screen
2. Simply click on the Gray toggle button next to Make yourself available
3. Click Yes to Confirmation window
4. It will turn to a Green toggle button

Disable Availability to take Chats
1. Go to Live Chat ->My Chats screen
2. Simply click on the On button
3. Select a reason for not being available and
4. Click Yes to Confirm
5. It will turn to an grey button

NOTE: The support agent can only pick up the chats if their availability is ON. If their availability is OFF and they try to pick up an incoming chat, they will get an error that will ask them to update their availability and then try to pick up the chat.
Accepting / Taking a Chat
· On the BOT, the user will be provided with feedback or further assistance based on the customization and requirements.
· Before connecting to a Live Agent an Open Ticket will be created
1. To take a Live Chat a support agent must first put themselves ON in My Chat
2. Clicks on the dropdown arrow that is on the right edge of the queue label, a dropdown will open showing the details (name/email id) of the user who is waiting.
3. Select the chat by clicking on the name/email id of the end-user
4. Review the conversation the end-user had with the bot and open the ticket that was created in the Chat Session window
5. To start talking to the end-user they must click on Click to Initiate Chat

Disconnecting User from Live Chat
Agents can disconnect the chats from their support portal (My Chats) module. Once they have completed assisting the user and want to end it chat:
· Click on the Disconnect button (Person Icon in the top right-hand corner of Chat Session box) while on the chat. This will close and remove the user session from their end.
· Once done, BOT will continue with the user as per the configured workflow.

NOTE: The system doesn’t allow Chat agents to log off from the system without Turning their availability OFF. In case, the agent tried to logoff without turning their availability OFF, the system gives them an error notification and asks agents to first turn off the availability and then logoff/ logout.
Using Canned Responses
Canned Responses can only be triggered when connected to an end-user.
1. Start talking to the end-user, click on Click to Initiate Chat
2. To trigger the Canned Response, type #,#, a list of your existing canned responses will appear
Note: You can follow the # with the text you entered as a key and press enter
3. Select the canned response you want and click enter to send

Rezolve.ai is an enterprise Agentic AI solution that deploys specialist AI agents for IT and shared services to reduce cost, accelerate resolution, and elevate employee experience.