Ticketing Queue and Category Administration

This article explains how to set- up queues and categories in Ticket Mgmt
Access level needed
- Ticketing Admin
Pre-requisite
- A queue is already created by the ASC team in their server so that clients can add users to it. Inform the ASC team to create a queue before you can add users / create user queues.
Instructions
1. To create a queue, navigate to Ticket Mgmt - > User queue.
2. Click on Create
3. Fill in all details as instructed below
· Queue Name: Start typing in the name of the queue that ASC has created on your request as a part or pre-requisite and select the desired one.
· User Name: Adding users who need to be a part of this queue
· Status: Select Published from the dropdown
4. Click on Create
Add a new agent/support staff to ticketing module
Access level needed - Ticket Admin
Pre-requisite
- User has already access virtual agent once and is available in User Management as a User with role “Ticket agent”.
Instructions
1. Elevate user access to be a ticketing agent by adding role Ticket agent from User Management.
2. Once complete you can follow the steps outlined in Add an agent/support staff to a new or existing ticketing queue
Note : To see the changes in access a user must logout and log back in.
Add an agent/support staff to a new or existing ticketing queue
Access level needed
- Ticketing Admin
Pre-requisite
- Queues are already created. If not, please follow steps to Create a User queue.
- The user that needs to be added is already a part of ticketing and has accessed ticketing module at least once and has a role assigned “Ticket agent”
Instructions
1. Click on Queue Name that you want to modify.
2. Under Username, start typing in the username that you want to add. The user will come as a suggestion. Select the user.
NOTE: If you don’t see the user come under the suggestion, then the user is not available in ticketing or has not accessed ticketing at least once, go to Add a new agent/support staff to ticketing module.
3. Select Status as Published from Dropdown.
4. Click on Update.
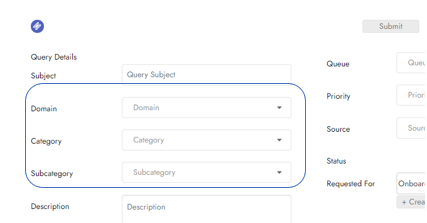
Ticketing Category Hierarchy
By default, the ticketing Category hierarchy is broken into 3 levels in a ticket; Domain, Category and Sub-category. We allow you to rename these levels, add additional levels or add values under each level.
Rename Label of ticketing Category hierarchy -
Access level needed - Ticket Admin
1. Select Ticket Management
2. Select Settings from the Ticketing sub-menu
3. Select Category Hierarchy
4. Click ‘Add new Level’ to add a new level your hierarchy.
5. Type a label for your hierarchy in the box that appears
6. Click ‘Update’ button when done
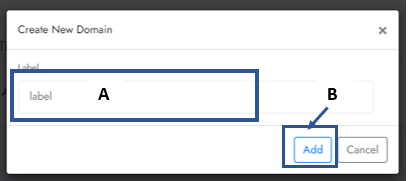
Add Domain to Ticketing Category Hierarchy level
Access level needed - Ticket Admin
1. Select Ticket Management
2. Select Settings from the Ticketing sub-menu
3. Select Category
4. Click + Add New Domain
5. Enter new domain in the label box
6. Click Add
Add a Category to the Ticketing Category Hierarchy level
Access level needed - Ticket Agent Supervisor

1. Select Ticket Management
2. Select Settings from the Ticketing sub-menu
3. Select Category
4. Click on the Domain you would like to add the category to
5. Click + Add Category
6. Enter the:
A. New Category in the label box
B. Click Add
Add a Sub-Category to the Ticketing Category Hierarchy level
Access level needed
- Ticket Agent Supervisor
1. Select Ticket Management
2. Select Settings from the Ticketing sub-menu
3. Select Category
4. Click on the Domain and then the Category you wold like to add the sub-category to
5. Click + Add Sub Category
6. Enter the:
A. New Sub-category in the label box
B. Click Add

Rezolve.ai is an enterprise Agentic AI solution that deploys specialist AI agents for IT and shared services to reduce cost, accelerate resolution, and elevate employee experience.