Signup to access
Thank you! Your submission has been received!
Oops! Something went wrong while submitting the form.
Signup to access

Workspace for Better Management

The Workspace feature was introduced for effective access management of the knowledge base and live chat requests. After setting up the Workspaces, admins and agents can be assigned according to the content (knowledge base and live chat) that they need access to. This is helpful when you have multiple departments using the same Rezolve.ai bot and Admin console.
  

Setting up a Workspace -
  

Access level needed - User Admin
  

Add Attributes -  

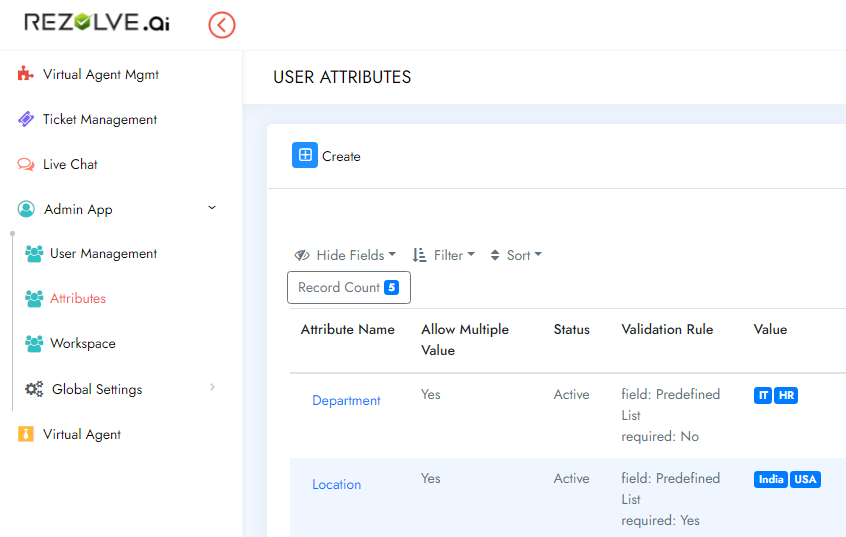
User Admin can go to Admin App> Attributes and add desired attributes. For example, you can add department attributes with values IT and HR. 

1. Click on the + 'Plus Sign' 

2. Fill out the form to create the Attribute and click Save 

Note: About Validation Rule – Attribute Type 

  • Predefined List– when applying the attribute to someone’s profile it can only be selected from a predefined list. If selected, two additional fields will show that you must fill out:

o Mandatory in User Profile – you can choose if adding this attribute is mandatory or not 

o Value – the options to be chosen from your list 

  • Free Text – when applying the attribute to someone’s profile it can be freely written
![](https://primarycdn.blob.core.windows.net/dd6f4d3c-b6db-11ea-b527-97167778fcab-public/Atex.png)

Configure Workspace -


Image

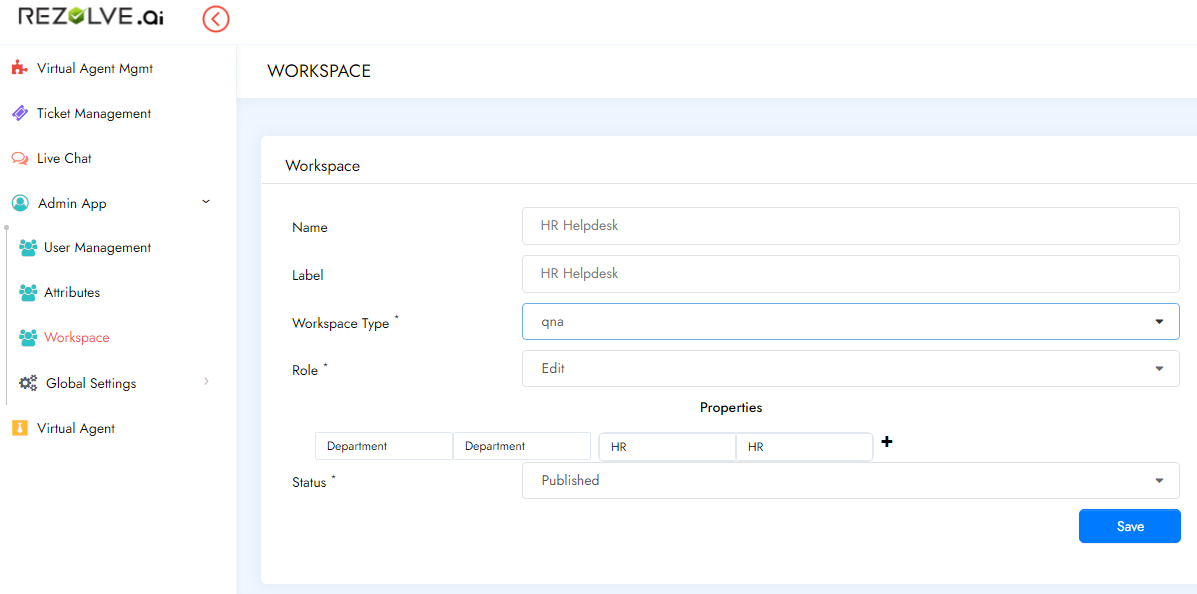
To set up a new workspace 'User Admin' can navigate to Admin App> Workspace
  

To add a new workspace -     

1. Click on the + 'Plus Sign' 

2. Type the name and label of the workspace 

3. Select the workspace type - 'qna' for 'Virtual Agent Mgmt' and 'livechat' for 'Live Chat'. Admin needs to configure workspace for 'Virtual Agent Mgmt' and 'Live Chat'. separately. 

4. Select the relevant Attribute and its Value in the Properties section: 

  • Key - Enter the name of the Attribute that will define who has access to this Workspace
  • Label – for the label box right next to Key, we recommend that the label should be the same as the Key
  • Value - Enter the Attribute's Value that will define who has access to this particular Workspace
  • Label – for the label box right next to Value, we recommend that the label should be the same as the Value

5. Select Status as 'Published' and 'Save' 

For example - HR Help desk workspace can be created using the Department attribute and value HR.
  

Assigning Workspace to a user - 

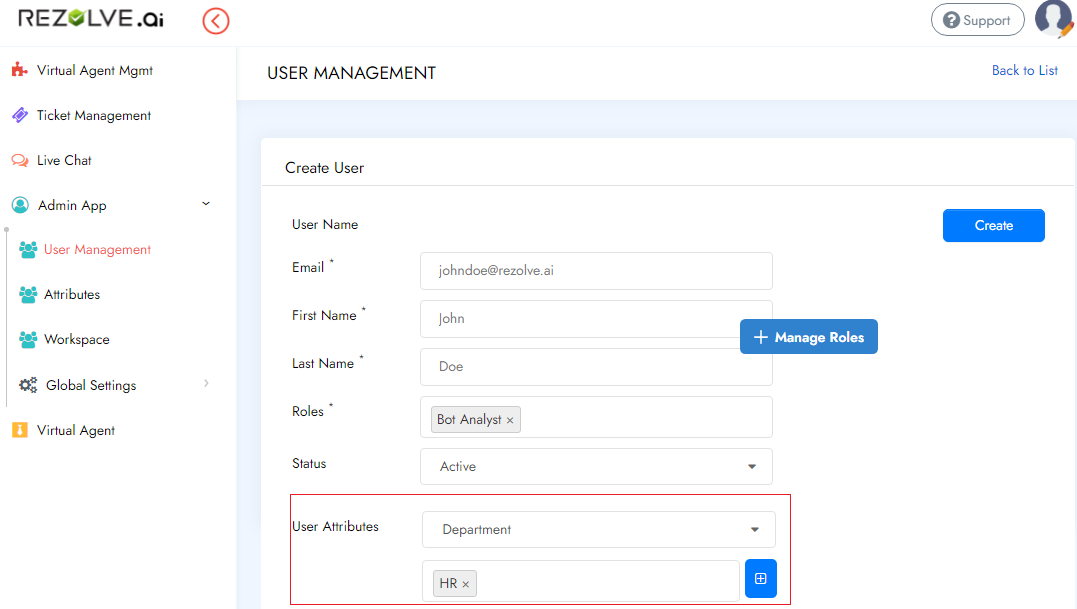
The attribute tagged in a user's profile desids the workspace access, therefore a user with attribute Department: HR will see the 'HR Help desk Workspace' only. User Admins can assign required Attributes to the user profile for granting workspace access.
  

Image


Workspace in Action -

Access level needed - Any of these roles with workspace access - Bot Admin, Bot Analyst, Chat Agent, Chat Agent Supervisor, Chat Agent Admin

A user having workspace access can view the workspace dropdown next to the profile icon. This dropdown can also be used for toggling between the workspaces.


Image
Download Document

Workspace for Better Management

The Workspace feature was introduced for effective access management of the knowledge base and live chat requests. After setting up the Workspaces, admins and agents can be assigned according to the content (knowledge base and live chat) that they need access to. This is helpful when you have multiple departments using the same Rezolve.ai bot and Admin console.
  

Setting up a Workspace -
  

Access level needed - User Admin
  

Add Attributes -  

User Admin can go to Admin App> Attributes and add desired attributes. For example, you can add department attributes with values IT and HR. 

1. Click on the + 'Plus Sign' 

2. Fill out the form to create the Attribute and click Save 

Note: About Validation Rule – Attribute Type 

  • Predefined List– when applying the attribute to someone’s profile it can only be selected from a predefined list. If selected, two additional fields will show that you must fill out:

o Mandatory in User Profile – you can choose if adding this attribute is mandatory or not 

o Value – the options to be chosen from your list 

  • Free Text – when applying the attribute to someone’s profile it can be freely written

![](https://primarycdn.blob.core.windows.net/dd6f4d3c-b6db-11ea-b527-97167778fcab-public/Atex.png)

Configure Workspace -


Image

To set up a new workspace 'User Admin' can navigate to Admin App> Workspace
  

To add a new workspace -     

1. Click on the + 'Plus Sign' 

2. Type the name and label of the workspace 

3. Select the workspace type - 'qna' for 'Virtual Agent Mgmt' and 'livechat' for 'Live Chat'. Admin needs to configure workspace for 'Virtual Agent Mgmt' and 'Live Chat'. separately. 

4. Select the relevant Attribute and its Value in the Properties section: 

  • Key - Enter the name of the Attribute that will define who has access to this Workspace
  • Label – for the label box right next to Key, we recommend that the label should be the same as the Key
  • Value - Enter the Attribute's Value that will define who has access to this particular Workspace
  • Label – for the label box right next to Value, we recommend that the label should be the same as the Value

5. Select Status as 'Published' and 'Save' 

For example - HR Help desk workspace can be created using the Department attribute and value HR.
  

Assigning Workspace to a user - 

The attribute tagged in a user's profile desids the workspace access, therefore a user with attribute Department: HR will see the 'HR Help desk Workspace' only. User Admins can assign required Attributes to the user profile for granting workspace access.
  

Image


Workspace in Action -

Access level needed - Any of these roles with workspace access - Bot Admin, Bot Analyst, Chat Agent, Chat Agent Supervisor, Chat Agent Admin

A user having workspace access can view the workspace dropdown next to the profile icon. This dropdown can also be used for toggling between the workspaces.


Image
Download Document
Thank you! Your submission has been received!
Oops! Something went wrong while submitting the form.